Staff guide: how to extend the PC display when using the Vevox PowerPoint add-in.
There are two ways in which extending your PC’s display can be used with Vevox:
Vevox dashboard on the tutor’s display and PowerPoint slides on the big screen facing the students.
Vevox dashboard on the tutor’s display andVevox Projector on the big screen facing the students.
See the full guide to the Vevox PowerPoint add-in for information on installing and using Vevox and PowerPoint
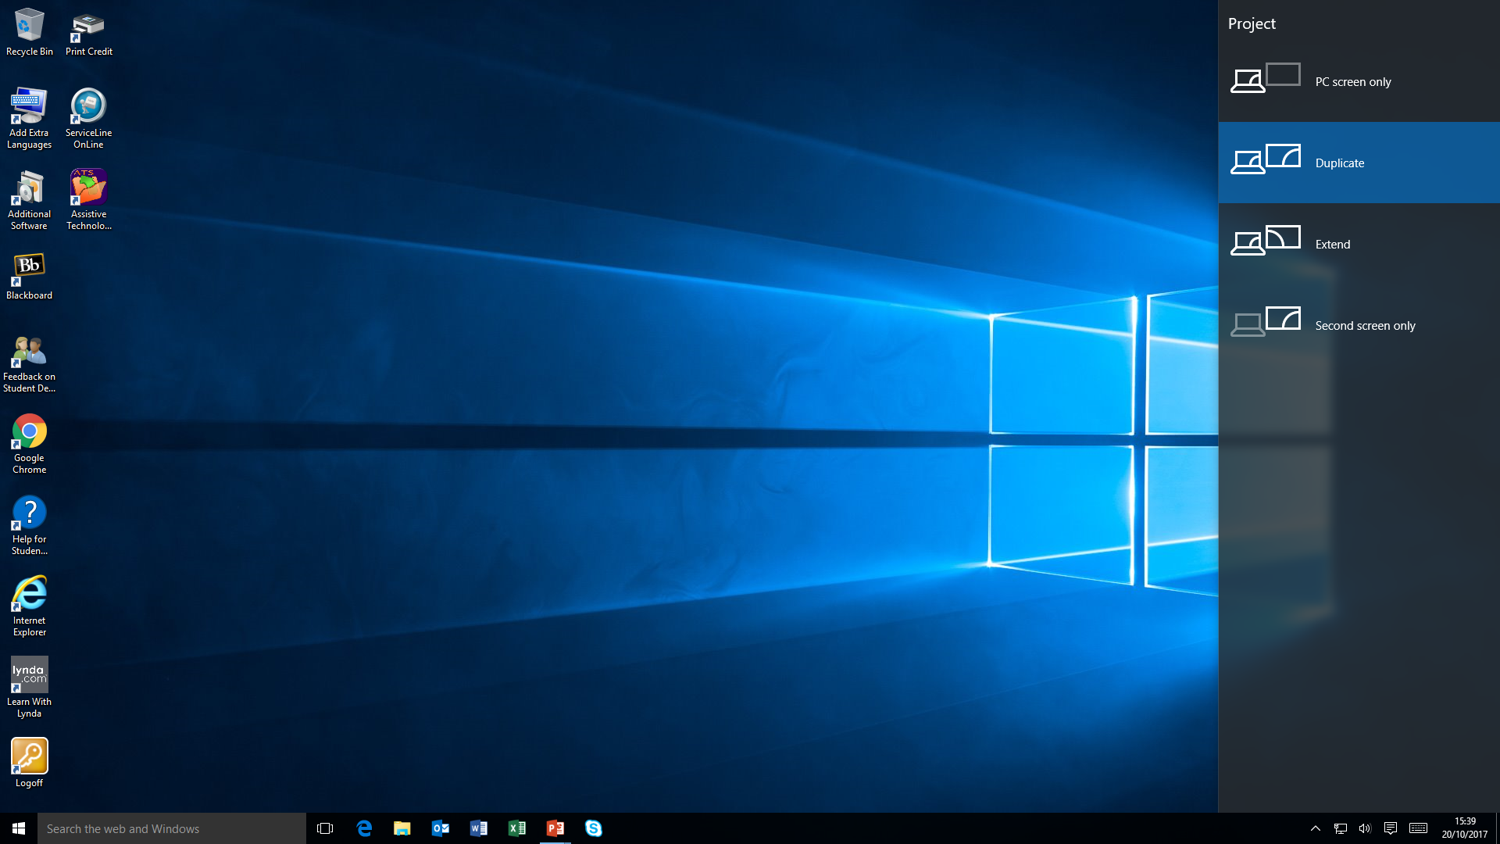
How to extend the display of CLS Windows PCs
Not all CLS PCs are able to extend their display – but the only way to tell is to try the process below to see if it works.
- Press the Windows key and tap P
- Click to select Extend, press Enter to activate and Esc to dismiss the selector.
The extended screen is to the right of your main display, so as you move your mouse off the right edge of your screen it appears on the left edge of the extended display. It does take a little practice to get used to moving your mouse from one display to the other, and you may occasionally lose your mouse pointer.
Tip: move your mouse decisively to the left and the pointer will be somewhere on the left edge of your main display.
Vevox and PowerPoint
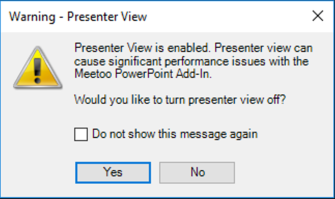
When PowerPoint detects an extended display, it defaults to ‘presenter view’ which uses the main screen to show your notes, the next slide and a timer while the extended screen shows the current slide. This is handy, but unfortunately causes problems with the Vevox add-in.
You’ll see a warning dialogue that allows you to easily turn off presenter view. Click Yes to continue.
A better use of the main screen is to view your Vevox dashboard, so you can see questions and comments posted by your students. This is a typical sequence at the start of the lecture:
- Log in to the PC and extend the display using Windows-P.
- Open your PowerPoint presentation and click the Dashboard button on the Vevox toolbar to open your dashboard in a web browser.
- Log in using your Vevox username (your University email address) and password.
- Open the Vevox meeting for this lecture and start it. Make a note of its Meeting ID.
- Switch back to PowerPoint, click the Connect button on the Vevox toolbar, log in (again) and enter the Meeting ID.
- Start presenting your slides, which appear on the extended display (facing your students).
- Select your web browser so you see your Vevox dashboard on the main display (facing you).
- Remember that you will need to move your mouse to the extended display and click to make PowerPoint the active application so you can click, press Enter or use the arrows keys to move from slide to slide.
This isn’t too different to using the Vevox add-in without extending the display (steps 2-6 are standard) and it only takes a little practice to add in steps 1, 7 and 8. You’ll need to repeat step 8 (move your mouse to the extended display and click) every time you switch from using the Vevox dashboard to presenting slides.
Vevox and the Projector
The Vevox Projector is a second browser tab that shows your students messages and polls, and ideally, they should see this rather than the Vevox dashboard. The dashboard will show them a live update of polling results as students vote, which may well affect their answer choice, whereas the Projector just shows them a clear display of the question and its answer choices. This is a typical sequence at the start of the lecture:
- Log in to the PC and extend the display using Windows-P.
- Open a web browser and go to login.vevox.com
- Log in using your Vevox username (your University email address) and password.
- Open the Vevox meeting for this lecture and start it.
- Write its Meeting ID on the board for your students.
- Click the Projector button in Vevox, which opens in a new browser tab.
- Select the Projector options you want – Vevox provide more details about these options.
- Click-and-drag the Projector’s browser tab to the extended screen and maximise it to fill the screen.
You may want to practice step 8 a few times – but it is an easy way to turn a browser tab into a new browser window.
Your Vevox dashboard is now on your main display (facing you) while the Projector is on the extended display, facing your students. You can open a PowerPoint presentation and mix that with Vevox if you wish; by default the slides will be shown on the extended display.
Tip: hold down the ALT key and tap the TAB key repeatedly to select the application you wish your students to view (i.e. the Vevox projector or the PowerPoint slides).